How to create company-wide email signatures and disclaimers in Office 365
- Log in to the Office 365 portal using an Exchange Online administrator account and access the Office 365 admin center as shown in the below image:

- Expand Admin centers and click Exchange.

Fig. 1. The Exchange option in the Office 365 Admin centers menu. - In the Exchange admin center click the mail flow option in the navigation pane (marked red in Fig. 2) and make sure that in the work pane the rules tab (marked yellow in Fig. 2) is selected.

Fig. 2. The Exchange admin center page with the mail flow rules interface visible. - Click the Plus icon and select Apply disclaimers… (Fig. 3).
This way the subsequent new rule popup window will already have the Apply disclaimers action selected (clicking the Create new rule… option opens the new rule window without any preselected attributes).
- Fig. 3. The list of available mail flow rules’ actions, with the Apply disclaimer action marked red.
- In the resulting new rule window type in the name of your rule and configure the settings according to your needs.
NOTE: To get more settings’ options (e.g. exceptions, the option to prepend the disclaimer) click the More options… link at the bottom of the new rule window (Fig. 4):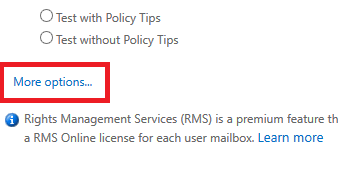
Fig. 4. The More options… button available at the bottom of the new transport rule window.
In the *Apply this rule if… section select the conditions that will trigger it. You can find the list of available conditions on this TechNet page.
In the *Do the following… section the Append the disclaimer… action should already be chosen (if it is not, use the dropdown menu to select it).
Now you have to enter the signature design. To do this click the Enter text… link and in the resulting specify disclaimer text popup window type in the text or HTML code of your organization-wide footer (Fig. 5).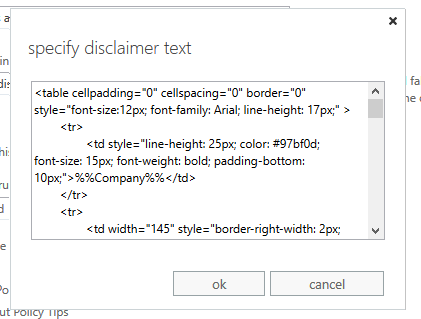
Fig. 5. Exchange Online mail flow rules: specify disclaimer text window.
To achieve automatic personalization, employ Exchange property variables such as First name, Last name, Contact details (such as e.g., phone number, mobile number, address etc.). When inserting them in the code, use the %%PropertyName%% pattern. It will cause users’ data to be automatically included in proper fields in their signatures. You can find the complete list of accepted properties on this TechNet page.
Next, select the preferred fallback action, which will be executed in case of problems with inserting the signature. The choices are: wrap (forward the original message as attachment and stamp the forward), ignore (send the message without a signature) or reject (don’t send the message).
HACK: You don’t have to be an html expert to create a professionally looking signature. Download one of the templates available in our free email signature template library and adjust it so that all the variables follow the %%PropertyName%% pattern. Then paste its html code in Office 365 and complete the rest of the steps from my guide. Our templates can even make it easier to include handy social media icons nearby your contact details. Head for “… with social icons” templates. - The remaining rule properties have default settings, which you can keep or adjust to your needs.
- Save your disclaimer rule settings by clicking Save at the bottom of the new transport rule window.
- Test the new signature.